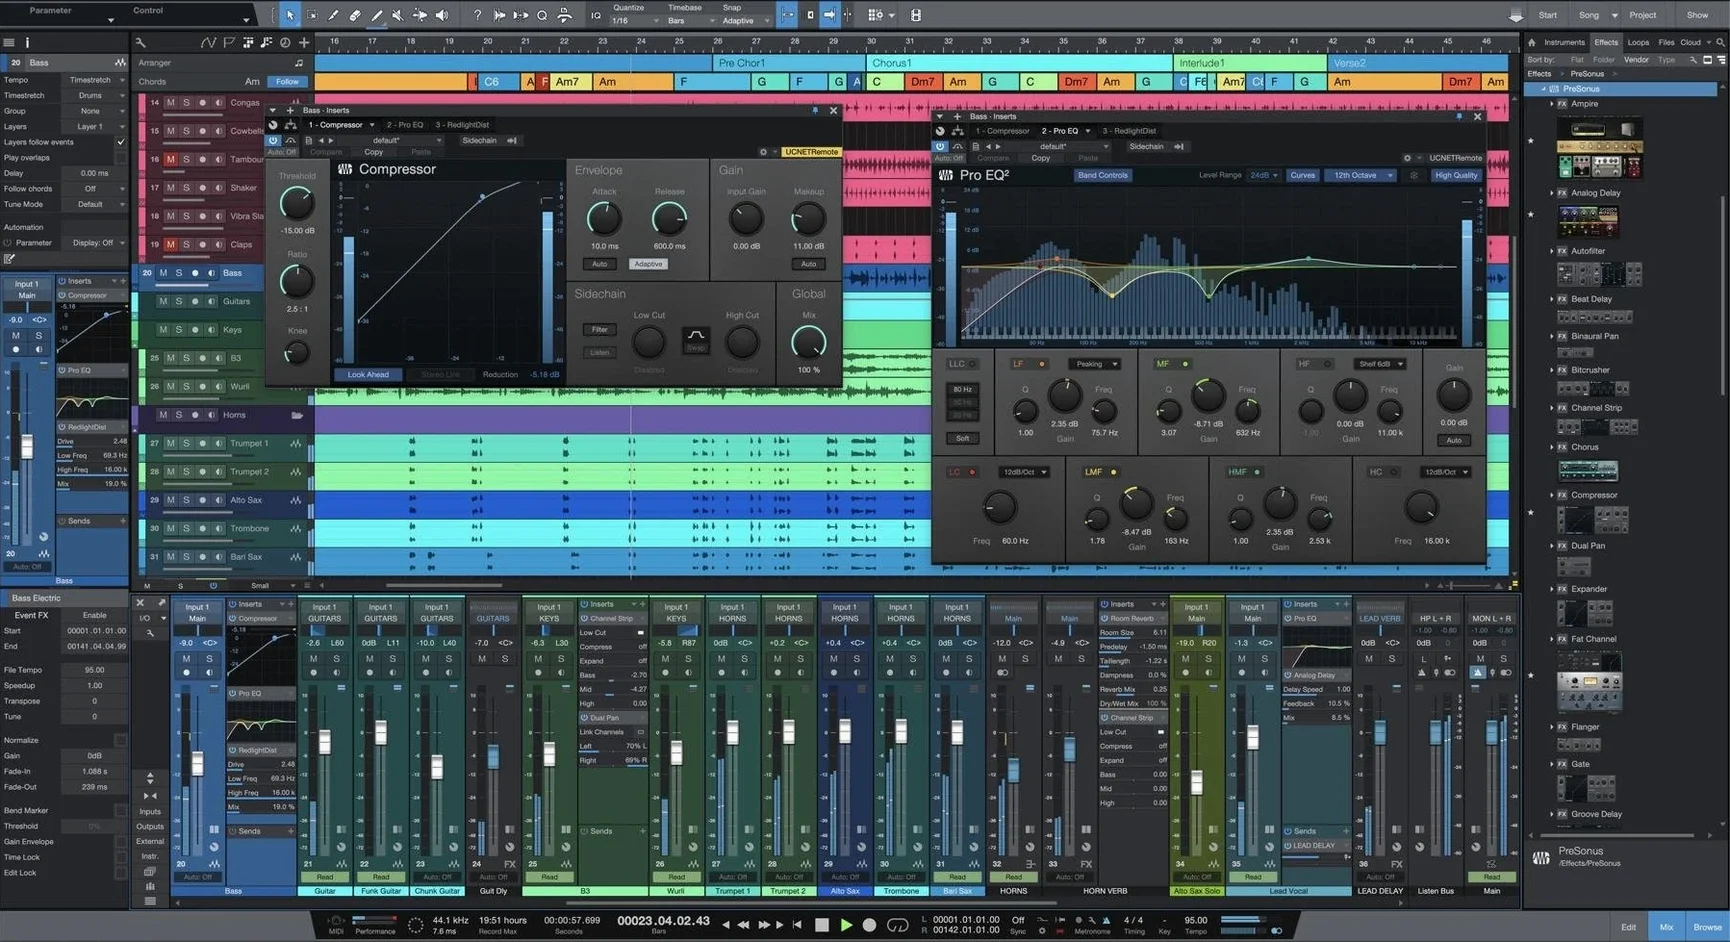
You open a rough mix sent by a guitarist. The timing drifts, and you need to pull the drums apart to build a solid foundation. This is a job for PreSonus Studio One 7.
Separate a stereo drum loop
Drag the stereo file onto a track. Right-click and select the new AI-powered Stem Separation. In seconds, the kicks and snares split onto separate lanes, ready for individual processing.
Fix drifting tempo
With the drums isolated, you turn on Advanced Tempo Detection. The Song page maps the human tempo to a grid without squashing the feel, so MIDI instruments lock in tight.
Build the arrangement
You open the Launcher, now with Unlimited Scenes and Playlists. You sketch a verse, chorus, and bridge by triggering sections live. The Song page captures everything on unlimited tracks, with Native Effects and virtual instruments for synthesis and sample playback ready to go.
From Loops to Live Recording Without the Learning Curve
Not every Mac user needs a full digital audio workstation. But a few groups find Studio One 7 fits their workflow better than alternatives.
- Bedroom producers shifting from loops to live recording. The drag-and-drop workflow and Smart Templates lower the jump from pattern-based tools to linear arrangement. Unlimited tracks mean they can layer vocals, guitar, and synth without hitting a ceiling.
- Mix engineers who receive messy sessions. Stem Separation on a stereo drum file or a poorly recorded live take saves an hour of manual phase correction. Advanced Tempo Detection locks the grid to the performance instead of forcing warping artifacts.
- Mastering engineers who compile albums. The Project page handles sequencing, spacing, and level matching across multiple songs. One session holds the entire EP or LP, so you hear transitions in context.
- Performers running backing tracks. Unlimited Launcher Scenes and Playlists let a solo artist trigger full arrangements live, with the flexibility to extend a chorus or skip a bridge on the fly.
A mix engineer's Tuesday afternoon
A client sends a three-song demo: drums, bass, vocals, and a stereo keys stem that buries the piano in reverb. The brief is tight for time and budget. Here's how the session moves.
First, the stereo keys stem hits the Session view. Right-click, run Stem Separation, and in under a minute the piano lands on one lane and the ambient wash on another. The piano gets a gentle compressor and some high-end EQ. The wash gets muted until the bridge, where it adds depth.
Second, the live drums show tempo drift. Advanced Tempo Detection maps the performance, so the programmed bass sits in the pocket. No manual slicing, no warping that chokes the transients.
Third, the three songs go into the Project page. Levels are matched, fades are drawn, and the gap between track two and three shrinks to 1.8 seconds. Export a single DDP image, and the job is out before dinner.
Stem Separation Slows on Intel, Flies on Apple Silicon
A few friction points show up in the first week. None are deal-breakers, but knowing them ahead saves frustration.
- Stem Separation runs slowly on older Intel machines. The AI processing leans on the Neural Engine in Apple Silicon Macs. On an Intel Mac, close other sessions and let the process finish before clicking elsewhere. Splitting a four-minute track takes longer but still completes.
- Advanced Tempo Detection misreads a sparse arrangement. If the algorithm locks to a ghost note or a bleed-heavy snare mic, manually tap the tempo on the transport bar for a few bars before running detection. That gives the engine a narrower range to search.
- The Launcher grid feels unfamiliar to Logic or Pro Tools users. Spend twenty minutes with a blank template. Drag in a drum loop, create two scenes, and record a MIDI bass part. The muscle memory forms faster than you expect.
- Version 7 installs alongside an existing Studio One 6 setup. Songs and projects open in both, but once saved in version 7 format they will not open in version 6. Keep a backup of the original file if you need to go back.
Pinning Your Top Three Smart Templates to the Start Page
The install is straightforward: open the included activation instructions, follow the steps, and launch the app. After that, a few moves make the workspace feel like yours.
- Customize the Start page. Pin your three most-used Smart Templates so they appear top-left. Remove the ones you never touch. The Start page is your launchpad, not a billboard.
- Build a default Song template. Create a session with your go-to routing: a drum bus, a vocal chain with a high-pass filter and a compressor, reverb and delay on sends. Save it as your default template so every new project starts with the plumbing ready.
- Learn the Stem Separation right-click. Pull in a reference track, a demo from last year, and a podcast clip. Run the separation on each. You will learn what it handles well (tight drums, clean vocals) and what it struggles with (heavily distorted guitars, low-bitrate mp3s). That knowledge pays off when a client is waiting.
- Map your most-used key commands. The default shortcuts are logical, but if you come from another DAW, spend an afternoon in Preferences. Map "split at cursor" and "bounce selection" to the muscle memory you already have.
- Test the Launcher with a quick idea. Drag in three loops, create two scenes, and record a scratch vocal. Switch between scenes while the transport runs. The sooner you treat the Launcher as a sketchpad, the faster arrangements take shape.
- New — Unlimited Launcher Scenes and Playlists, AI-powered offline Stem Separation, and Advanced Tempo Detection.
- macOS 12.4 or later
- Apple Silicon and Intel support
- Interface: English
Comments 0
Sign in to leave a comment.Sign inCreate an account
No comments yet. If a step is still there after you install it, say so.
More in Mac Apps
All in Mac Apps Sublime Text
Edits code and text fast with multiple cursors and instant project search.
14 steps saved
 Updated
Super Vectorizer Pro
Converts a flat raster logo into a scalable vector for print or CNC work.
21 steps saved
 SuperDuper!
Creates a full, bootable clone of your entire drive on any modern Mac.
23 steps saved
 Steinberg Nuendo
Provides a dedicated audio post-production workstation built for dialogue, Atmos, and game audio.
10 steps saved
 Swinsian
Plays a large local music library with smart playlists and wide format support.
17 steps saved
 Swish
Snaps windows and switches spaces with gestures on a Magic Trackpad or Magic Mouse.
17 steps saved
 SwitchResX
Unlocks hidden screen resolutions and saves complete monitor configurations per setup.
12 steps saved
 Updated
SoundSource
Routes every app's audio to a different output from the menu bar.